Over the past few month, I had multiple opportunities to work with latest Sitecore Install Framework, my experience was very positive, and even though, I’ve seen more struggle with this new approach, I personally strongly believe that having the ability to script your environment provisioning is the correct way to go and it fits DevOps paradigm very well. There are few critical changes that we must understand before start provisioning of our Sitecore 9 instance. First, we need to secure communication between XDB and Sitecore website and second, we need to install Solr. To get started with 9 please review this Sitecore Compatability table and this one for Solr. Also, please review Sitecore Installation Guide as it is the most comprehensive source of information for Sitecore 9 installation.
- Server 2012 or 2016
- Sql Server 2016 SP1 or use SQL Azure
- .NET 4.6+ and ASP .NET 5.2.2+
- Solr 6.6.2 or 6.6.1. Older or newer versions of Solr will not work with Sitecore
Prerequisites:
Before installing Sitecore we need to ensure our system is configured correctly. Sitecore Install Framework error messaging could be deceiving at a times and as such having proper system configuration is essential. I recommend starting with a fresh instance of Windows Server 2016 installed on Virtual Machine.
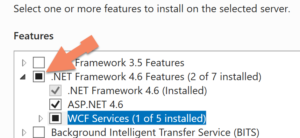
- Navigate to Server Manager->Dashboard and click on “Add Roles and Features”. Install IIS and .NET 4.6.2 as shown below.

- Download and Install Web Platform Installer 5 and add Url Rewrite 2.1 module and WebDeploy 3.6 For hosting Servers modules.

- Install Microsoft® SQL Server® Data-Tier Application Framework (June 30 2016)( https://www.microsoft.com/en-us/download/details.aspx?id=53013)
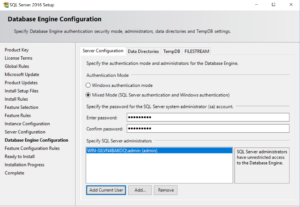
- Install SQL Server 2016 SP1 with Mixed Authentication Mode
- Update Contained DB Authentication by running this SP:
sp_configure 'contained database authentication', 1;
GO
RECONFIGURE;
GO
- Install the Java JRE (http://www.oracle.com/technetwork/java/javase/downloads/jdk9-downloads-3848520.html)
- Download and install Solr. (http://archive.apache.org/dist/lucene/solr/6.6.2/solr-6.6.2.zip)
- Note:Newer versions of Solr will not work.
- Unzip the archive to “C:\” (where it will create a folder called “Solr-6.6.2”)
- Open a command prompt as an administrator and navigate to: C:\Solr-6.6.2\server\etc
Execute:
“C:\Program Files\Java\jre-9.0.4\bin\keytool.exe -genkeypair -alias solr-ssl -keyalg RSA -keysize 2048 -keypass secret -storepass secret -validity 9999 -keystore solr-ssl.keystore.jks -ext SAN=DNS:localhost,IP:127.0.0.1 -dname "CN=localhost, OU=Organizational Unit, O=Organization, L=Location, ST=State, C=Country"
Check if solr-ssl.keystore.jks file is created in ‘etc’ forlder
- Run importkeystore command and use “secret” for the destination keystore password (plus confirmation prompt) and source keystore password prompts
“C:\Program Files\Java\jre-9.0.4\bin\keytool.exe” -importkeystore -srckeystore solr-ssl.keystore.jks -destkeystore solr-ssl.keystore.p12 -srcstoretype jks -deststoretype pkcs12
Import(double click) generated certificate file solr-ssl.keystore.p12 that was created in the C:\Solr-6.6.2\server\etc directory. Match the values below when prompted:
Store Location: Local Machine
Password: “secret” (no quotes)
Certificate store: Trusted Root Certificate Authorities
- Update the C:\solr-6.6.2\bin\solr.in.cmd file by pasting the following code block at the end of the file.
Ensure this code block matches what you used as the certificate name and password during the certificate creation and installation process.
set SOLR_SSL_KEY_STORE=etc/solr-ssl.keystore.jks
set SOLR_SSL_KEY_STORE_PASSWORD=secret
set SOLR_SSL_KEY_STORE_TYPE=JKS
set SOLR_SSL_TRUST_STORE=etc/solr-ssl.keystore.jks
set SOLR_SSL_TRUST  _STORE_PASSWORD=secret
set SOLR_SSL_TRUST_STORE_TYPE=JKS
set SOLR_SSL_NEED_CLIENT_AUTH=false
- Run Solr:
Solr.cmd start
(please considering running Solr as a windows service)
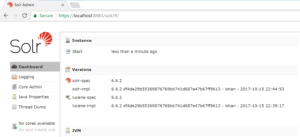
Important: Test Solr installation by navigating to this URL: https://localhost:8983/solr/. Do not continue with Sitecore installation until Solr interface is shown.
Installing Sitecore
- Download and Unzip Sitecore files to a folder, called ‘resourcefiles’. Ensure that license file is placed in the root of the folder

- Create Install.ps1 script from the code below or copy it from here or from Sitecore Installation Guide
Install.ps1
#define parameters
$prefix = "sitecore901xp0"
$PSScriptRoot = “C:\resourcefiles”
$XConnectCollectionService = "$prefix.xconnect"
$sitecoreSiteName = "$prefix.sc"
$SolrUrl = "https://localhost:8983/solr"
$SolrRoot = "C:\Solr-6.6.1"
$SolrService = "Solr-6.6.1"
$SqlServer = ".\MSSQLSERVER16"
$SqlAdminUser = "sa"
$SqlAdminPassword="xxxxxx"
#install client certificate for xconnect
$certParams = @{
Path = "$PSScriptRoot\xconnect-createcert.json"
CertificateName = "$prefix.xconnect_client"
}
Install-SitecoreConfiguration @certParams -Verbose


#install solr cores for xdb
$solrParams = @{
Path = "$PSScriptRoot\xconnect-solr.json"
SolrUrl = $SolrUrl
SolrRoot = $SolrRoot
SolrService = $SolrService
CorePrefix = $prefix
}
Install-SitecoreConfiguration @solrParams


#deploy xconnect instance
$xconnectParams = @{
Path = "$PSScriptRoot\xconnect-xp0.json"
Package = "$PSScriptRoot\Sitecore 9.0.1 rev. 171219 (OnPrem)_xp0xconnect.scwdp.zip"
LicenseFile = "$PSScriptRoot\license.xml"
Sitename = $XConnectCollectionService
XConnectCert = $certParams.CertificateName
SqlDbPrefix = $prefix
SqlServer = $SqlServer
SqlAdminUser = $SqlAdminUser
SqlAdminPassword = $SqlAdminPassword
SolrCorePrefix = $prefix
SolrURL = $SolrUrl

}
Install-SitecoreConfiguration @xconnectParams
#install solr cores for sitecore
$solrParams = @{
Path = "$PSScriptRoot\sitecore-solr.json"
SolrUrl = $SolrUrl
SolrRoot = $SolrRoot
SolrService = $SolrService
CorePrefix = $prefix
}
Install-SitecoreConfiguration @solrParams
#install sitecore instance
$xconnectHostName = "$prefix.xconnect"
$sitecoreParams = @{
Path = "$PSScriptRoot\sitecore-XP0.json"
Package = "$PSScriptRoot\Sitecore 9.0.1 rev. 171219 (OnPrem)_single.scwdp.zip"
LicenseFile = "$PSScriptRoot\license.xml"
SqlDbPrefix = $prefix
SqlServer = $SqlServer
SqlAdminUser = $SqlAdminUser
SqlAdminPassword = $SqlAdminPassword
SolrCorePrefix = $prefix
SolrUrl = $SolrUrl
XConnectCert = $certParams.CertificateName
Sitename = $sitecoreSiteName
XConnectCollectionService = "https://$XConnectCollectionService"
}
Install-SitecoreConfiguration @sitecoreParams

Here an example:
- From the “C:\resourcefiles” directory, run the installer script from the (elevated) PowerShell console. .
.\install.ps1
- Test that Sitecore was installed correctly.
Visit http://sitecore901xp0.sc (the rendered version of your website)
Done!
Recent Comments