The Sitecore 8.2 update 1+ was the first major release that took Sitecore to a cloud as a service. The Sitecore Azure Module was available since version 6, but it was never widely accepted due to support and installation challenges. With the support of PowerShell and Azure Toolkit, Sitecore can be installed as App Service in Azure with minimal effort now.
In this article, I’ll review Sitecore provisioning into AppService using PowerShell, Azure Toolkit and Environment Templates in 10 steps and under 45 minutes.
Prerequisites
- Provision Azure Account and obtain Subscription Id.
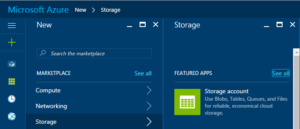
- Create Microsoft Storage account using this guide or just go to Azure Portal, click “+” -> Storage->Storage Account and select blob storage.
3. Using this table, select the appropriate configuration. The source can be found here.
| Configuration | Description |
|---|---|
| XP0 | This is Sitecore Experience Platform running as a single WebApp instance. Use this configuration for development and testing purposes. It is best practice to use the XM1 or XP1 configuration in production environments for security and scalability reasons. |
| XM1 | This is Sitecore Experience Management configuration running two roles: Content Delivery and Content Management. Use this environment when you are not planning to use Analytics and Marketing features of Sitecore Experience Platform (that is, in CMS-only mode). |
| XP1 | This is Sitecore Experience Platform configuration running four roles: Content Delivery, Content Management, Processing, and Reporting. Use this environment when you are planning a fully-featured Sitecore Experience Platform installation. |
Download profile from this location
4. Upload profile file to Azure Storage and set aside location URL. Make sure to secure the file as it is not designed for public download.
5. Download Sitecore Azure Toolkit and unzip it to your workplace location. Make sure to ‘unblock’ it before unzipping.
6. Clone or Download Sitecore Azure Quickstart Templates .Select templates that match profile selected in step #3.
7. Put Sitecore license into your workplace folder.
8. Create 4 Mongo databases (analyticsdb, tracking_live, tracking_history and tracking_contact). For purpose of this article, I used free mlab account.
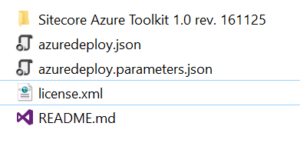
After you done, your local file structure should look like this:
Configuration
9. Updated azuredeploy.parameters.json file.
DeploymentId – Name of Azure Resource Group
sitecore.admin.password – default password to Sitecore admin interface.
analytics.mongodb.* – Mongo connection strings. Could be pulled from mlab interface.
sqlserver.* – new username/password that will be used in provisioning MS SQL DB
single.msdeploy.packageurl – location of Sitecore deployment package, created in step #4
Example:
{
  "deploymentId": {
    "value": "XXXXXXX"
  },
  "sitecore.admin.password": {
    "value": "XXXXXXXX"
  },
  "analytics.mongodb.connectionstring": {
    "value": "mongodb://xxxx:xxxx@xxxx.mlab.com:50739/scanalytics"
  },
  "tracking.live.mongodb.connectionstring": {
    "value": "mongodb://xxxx:xxxx@xxxx.mlab.com:50739/tracking_live"
  },
  "tracking.history.mongodb.connectionstring": {
    "value": "mongodb://xxxx:xxxx@xxxx.mlab.com:50739/tracking_history"
  },
  "tracking.contact.mongodb.connectionstring": {
    "value": "mongodb://xxxx:xxxx@xxxx.mlab.com:50739/tracking_contact"
  },
  "sqlserver.login": {
    "value": "xxxx"
  },
  "sqlserver.password": {
    "value": "xxxx"
  },
  "single.msdeploy.packageurl": {
    "value": "https://scazure.blob.core.windows.net/xxxxxx/Sitecore%208.2%20rev.%20161221_single.scwdp.zip"
  },
}
10. Create a PowerShell script, based on this code.
#Azure SubscriptionID
$SubscriptionId = "xxxxx-xxx-xxxx-xxxx-xxxxxxx";

#Name of Resource Group /should be similar to Deployment ID
$Name = "SitecoreAzureSingle01";

#Path to Sitecore license file
$LicenseXmlPath = ".\license.xml";

#Path to the ARM template file for the environment configuration to deploy.
$ArmTemplatePath = ".\azuredeploy.json";

#Path to the populated parameters.json file for the selected template.
$ArmParametersPath = ".\azuredeploy.parameters.json";

#Name of Azure Datacenter
$location = "East US";

#Documentation:
#https://doc.sitecore.net/cloud/working_with_sitecore_azure/configuring_sitecore_azure/deploy_a_new_sitecore_environment_to_azure_app_service


#Load the Azure Toolkit module
Import-Module ".\Sitecore Azure Toolkit 1.0 rev. 161125\tools\Sitecore.Cloud.Cmdlets.psm1" -Verbose

#Add Azure account
Add-AzureRMAccount

#Select subscription to deploy into:
Set-AzureRMContext -SubscriptionId $SubscriptionId

#Start provisioning using the Start-SitecoreAzureDeployment commandlet
Start-SitecoreAzureDeployment -location $location -Name $Name -ArmTemplatePath $ArmTemplatePath  -ArmParametersPath $ArmParametersPath -LicenseXmlPath $LicenseXmlPath -SetKeyValue @{}
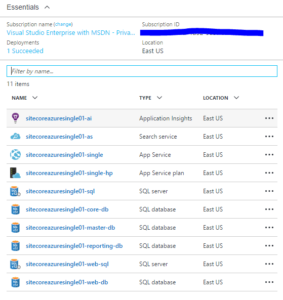
11. Run above script and wait for 15 minutes (for XP0 profile). Navigate to Azure portal to review created assets.
.\Deploy.ps1


")
very helpful, thanks for sharing
Great post Boris, helped me a lot to get started, thanks!
Amazing post Boris, I know know how to deploy!