Azure Digital Twin alongside Azure Sphere are two new next-gen IoT technologies released by Microsoft last year, and even though Digital Twin is part of the IoT paradigm, in reality, its application goes way beyond it; we already see Digital Twin used to drive the digitization of real-world objects and processes with an aim to have deeper insights into past, current, and future states and drive improvements to user experience across different industries and platform. The usage of Azure Digital Twin will only continue to grow – according to Gartner research, Digital Twin is the top 10 strategic technology of 2019/20/21 helping deliver Hyperautomation of business through digital modeling of physical environments.
Naturally, Digital Twins are a great choice for manufacturing and building monitoring/automation, connecting IoT sensors to improve spatial analysis and to control processes remotely, and with the maturity of IoT and technology in general, other applications can benefit from this new technology as well. In this blog, I’ve experimented with applying Azure Digital Twin in a retail setting in order to improve the in-store user experience. In my hypothetical scenario, I would want users to conduct more business online, but only when store occupancy at any specific moment is high. To solve this, I’ve used a people-counter AI application, along with Digital Twin to model store state. I’ve used personalization features of Sitecore Experience Commerce, integrated with Azure Digital Twin, to deliver online discounts based on store occupancy. This hypothetical scenario can be extended to other aspects of Retail business, such as supply chain management, logistics, and warehousing – giving a true 360-degree digital view and control of Retail business.
This is truly a low-code application, only requires a ‘glue’ to connect the systems. At the base of my application is a people counter. In order to simplify this POC, I used Azure Vision API, along with a simple .NET Core Client App to process images and use Azure’s cognitive services to get a count of ‘people’ objects. The recommended and production-ready approach should include Azure Spatial Analytics Container, running on IoT Edge device. This will improve data accuracy, security/privacy, and long-term cost compare using Azure Vision API.
Azure Cognitive service Client Console App:
namespace computer_vision_counter
{
    class Program
    {
        //vision API conneciton info
        static string subscriptionKey = "xxxx";
        static string endpoint = "https://xxxx.cognitiveservices.azure.com/";
        //IoT Hub connection info
        private static DeviceClient s_deviceClient;
        private static readonly TransportType s_transportType = TransportType.Mqtt;
        private static string s_connectionString = "xxxx";

        static async Task Main(string[] args)
        {
            while (true)
            {
                Console.WriteLine("Image: ");
                string line = Console.ReadLine();
                Console.WriteLine("You entered (asynchronous logic): " + line);

                s_deviceClient = DeviceClient.CreateFromConnectionString(s_connectionString, s_transportType);

                ComputerVisionClient client = Authenticate(endpoint, subscriptionKey);

                int cnt = await DetectObjectsUrl(client, line);
                await SendDeviceToCloudMessagesAsync(cnt);
                s_deviceClient.Dispose();
            }
        }
        public static async Task DetectObjectsUrl(ComputerVisionClient client, string urlImage)
        {
            Console.WriteLine("COUNTING PERSONS");
            using (Stream stream = File.OpenRead(urlImage))
            {
                // Make a call to the Computer Vision service using the local file
                DetectResult results = await client.DetectObjectsInStreamAsync(stream);

                // Detect the objects
                var x = results.Objects.Where(a => a.ObjectProperty == "person").Count();
                return x;
            }
        }
        public static ComputerVisionClient Authenticate(string endpoint, string key)
        {
            ComputerVisionClient client =
              new ComputerVisionClient(new ApiKeyServiceClientCredentials(key))
              { Endpoint = endpoint };
            return client;
        }

        private static async Task SendDeviceToCloudMessagesAsync(int count)
        {

            // Create JSON message
            string messageBody = System.Text.Json.JsonSerializer.Serialize(
                new
                {
                    occupancy = count

                });
            using var message = new Message(Encoding.ASCII.GetBytes(messageBody))
            {
                ContentType = "application/json",
                ContentEncoding = "utf-8",
            };

            // Add a custom application property to the message.
            // An IoT hub can filter on these properties without access to the message body.
            message.Properties.Add("occupancyAlert", (count > 8) ? "true" : "false");

            // Send the telemetry message
            await s_deviceClient.SendEventAsync(message);
            Console.WriteLine($"{DateTime.Now} > Sending message: {messageBody}");

            await Task.Delay(1000);
        }
    }

}
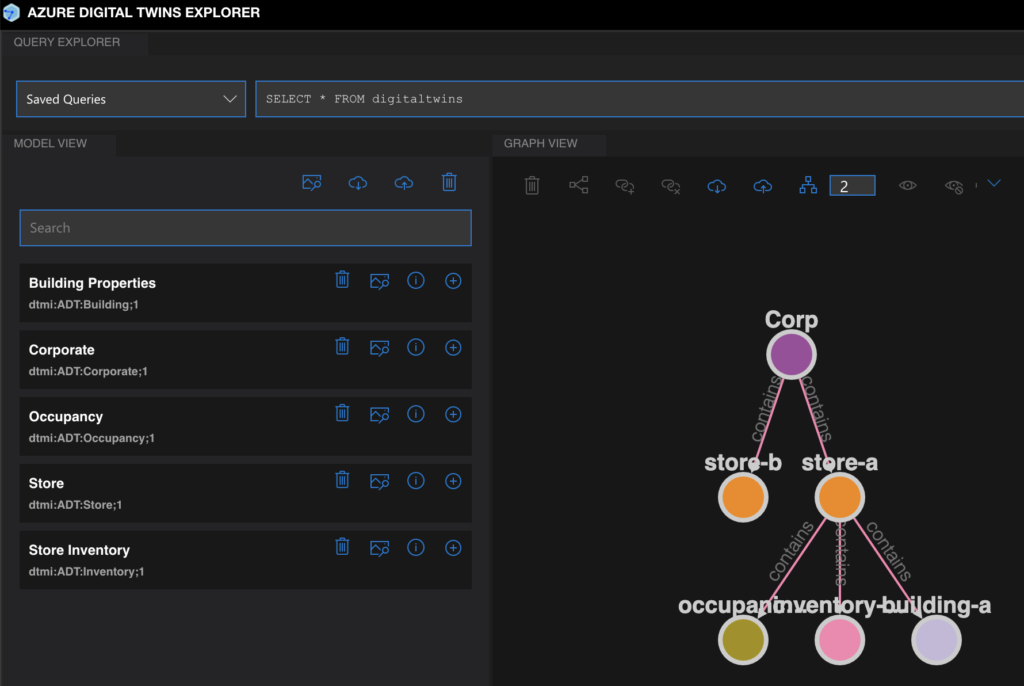
Azure Function reacts to Azure Event Grid trigger, created by IoT Hub, and applies telemetry to Azure Digital Twin Model. The models are created using Digital Twin Definition Language, with the end goal to digitalize all activities, processes, and telemetry, and inventory of the store. In this demo, we will only use the Occupancy model. I’ve used Azure Digital Twin Explorer to upload, manage and review the content of my custom models. I’ve used az-dt-twin command to create Model relationships.
az dt twin relationship create -n "XXXX.api.eus2.digitaltwins.azure.net" --relationship-id "id-1" --relationship contains --twin-id "CommerceCompany" --target "Store-A"
Model:
[
  {
    "@id": "dtmi:ADT:Corporate;1",
    "@type": "Interface",
    "displayName": "Corporate",
    "@context": "dtmi:dtdl:context;1"
  },

  {
    "@id": "dtmi:ADT:Store;1",
    "@type": "Interface",
    "displayName": "Store",
    "@context": "dtmi:dtdl:context;2",
    "contents": [
      {
        "@type": "Property",
        "name": "Capacity",
        "schema": "int"
      },
      {
        "@type": "Relationship",
        "name": "occupancyDetails",
        "target": "dtmi:com:contoso:Occupancy;1"
      }

    ]

  },

  {
    "@id": "dtmi:ADT:Occupancy;1",
    "@type": "Interface",
    "displayName": "Occupancy",
    "EmployeeOccupancy": [
      {
        "@type": "Property",
        "name": "Occupancy",
        "schema": "int"
      }
    ],
  }
]
Azure Function client used to update ADT values:
namespace dtUpdater
{
public class dtUpdater
{
private static readonly string adtInstanceUrl = Environment.GetEnvironmentVariable("ADT_SERVICE_URL");
private static readonly HttpClient httpClient = new HttpClient();
[FunctionName("IoTHubtoTwinsUpdater")]
public async void Run([EventGridTrigger] EventGridEvent eventGridEvent, ILogger log)
{
if (adtInstanceUrl == null) log.LogError("Application setting "ADT_SERVICE_URL" not set");
try
{
// Authenticate with Digital Twins
var cred = new ManagedIdentityCredential("https://digitaltwins.azure.net");
var client = new DigitalTwinsClient(
new Uri(adtInstanceUrl),
cred,
new DigitalTwinsClientOptions { Transport = new HttpClientTransport(httpClient) });
log.LogInformation($"ADT service client connection created.");
if (eventGridEvent != null && eventGridEvent.Data != null)
{
log.LogInformation(eventGridEvent.Data.ToString());
JObject deviceMessage = (JObject)JsonConvert.DeserializeObject(eventGridEvent.Data.ToString());
string deviceId = (string)deviceMessage["systemProperties"]["iothub-connection-device-id"];
int occupancy = (int)deviceMessage["body"]["occupancy"];
var updateTwinData = new JsonPatchDocument();
updateTwinData.AppendReplace("/Occupancy", occupancy);
await client.UpdateDigitalTwinAsync("occupancy-a", updateTwinData);
}
}
catch (Exception ex)
{
log.LogError($"Error in ingest function: {ex.Message}");
}
}
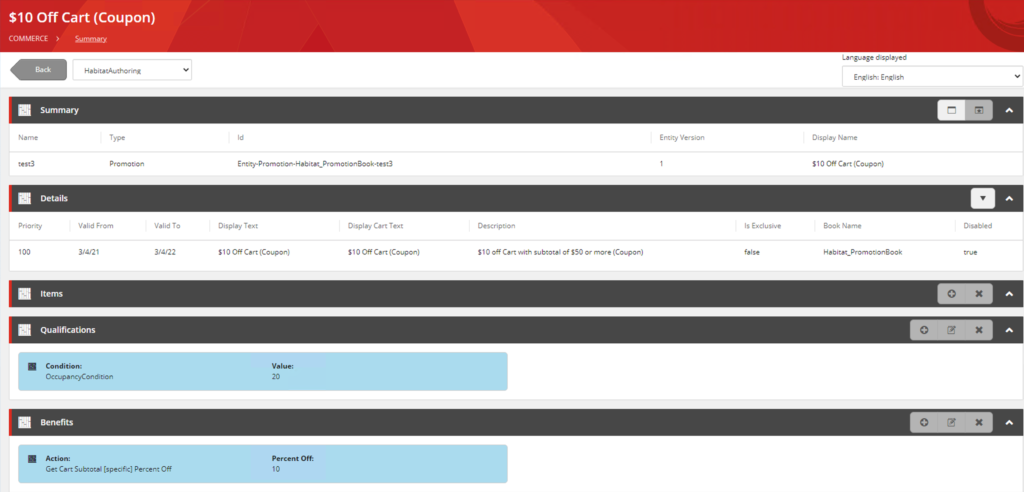
}Finally, we use the Sitecore Rule engine and Sitecore Experience Commerce, Promotion Personalization engine to configure Discount banner and apply disconts to the car line items.
Azure Digital Twin/Sitecore integration:
namespace Sitecore.Commerce.Plugin.Sample.Conditions
{
    [EntityIdentifier("OccupancyCondition")]
    public class IsUserFromTexas : ICondition
    {
        public IRuleValue Value { get; set; }
        public bool Evaluate(IRuleExecutionContext context)
        {
            string adtInstanceUrl = "https://xxxx.digitaltwins.azure.net";
            //replace with proper auth method
            var credential = new DefaultAzureCredential();
            var client = new DigitalTwinsClient(new Uri(adtInstanceUrl), credential);

            OccupancyDigitalTwin twin;
            Response twinResponse =  client.GetDigitalTwin("occupancy-a");
            twin = twinResponse.Value;
            var val = Value.Yield(context);
            if (twin.Occupancy >= val) {
               return  true;
            }
            return false;
        }


        internal class OccupancyDigitalTwin
        {
            [JsonPropertyName(DigitalTwinsJsonPropertyNames.DigitalTwinId)]
            public string Id { get; set; }

            [JsonPropertyName(DigitalTwinsJsonPropertyNames.DigitalTwinETag)]
            public string ETag { get; set; }

            [JsonPropertyName("Occupancy")]
            public int  Occupancy { get; set; }


        }
    }
}
The Digital Twin technology is certainly a path to Retail 4.0, whether it is used to model user experiences in-store or manage warehousing and logistics, it can provide an innovative edge many retails desperately need to stay competitive. Starting digitizing your business is easy, you can start as small as this project, delivering your first Retail Digital Twin in just a few weeks, or use a strategic approach and deliver more value by digitizing critical aspects of your retail business.


")
Recent Comments